Pages

Wednesday, September 29, 2010

Basic Cookie Dough 2 - Woolworths Recipe

Biscuits: 29-Dec-09


Basic Cookie Dough recipe is from Woolworths Fresh Magazine, Issue 46, December 2009, Cinnamon Snowflakes, pg 76.

I think this recipe turned out much nicer than the previously blogged about basic cookie dough 1... :-D

Ingredients:
250g butter, softened (I used unsalted butter)
3/4 cup caster sugar (I found this a bit sweet, so would reduce perhaps to 1/2 cup caster sugar)
1 egg yolk 
1 tsp vanilla extract (I used vanilla essence & it was OK)
2 1/4 cups plain flour


Topping:
1/4 cup caster sugar
1/2 tsp ground cinnamon
1/2 block Plaistowe white chocolate
rainbow coloured chocolate bits

Method:
1. Preheat oven to 180oC. Line 2 baking trays with non-stick baking paper.
2. Beat butter & sugar together for about 8 minutes until pale & creamy.
3. Add egg yolk & vanilla and beat until smooth.
4. Sift flour over butter mixture & gently stir in until well combined.
5. Divide mixture into half, wrap in plastic wrap & chill for about 15 minutes.
6. Roll 1 portion of dough at a time on a lightly floured surface (or between 2 sheets of cling wrap) until approx 3 mm thick.
7. Cut out biscuits using snowflake or other shaped cutter (I used hearts & ice-cream shaped cutters) and arrange on baking tray.

Note: If you want, press an ice-cream stick behind the cookie shape - in this case, the heart shape & put a bit of dough to cover the top of the ice-cream stick to secure it to the back of the heart cookie.


Topping:

(a) Heart Shaped cookie on sticks:
Combine sugar & cinnamon (quantities under topping) and sprinkle over biscuits to lightly coat (I sprinkled only on the heart shapes & left the ice-cream shapes plain for other toppings).
Bake for approx 8 - 10 mins until golden (I baked at 170oC for about 20 mins).
Leave cookies in tray for about 5 minutes before removing & cooling on wire racks.


(b) Ice-cream cones:
Once completely cooled, melt white chocolate in microwave for about 30 secs (watch it though as white chocolate can burn!). then put on ice-cream cone & sprinkle with rainbow chocolate chips. 
Refridgerate till white chocolate hardens.

Hubby complimented by telling me that I should make these for church fundraiser or something! *hehe* whilst others that night (I brought them to a friend's place that night after baking them) said it looked pretty & quite professional... Yay! :-)


Did these ones for my SIL's b'day... 


These next lot I made for Maureen had a special symbolism behind the different shapes...  :-D 

Gingerbread with
- red buttons - E
- green buttons - N
- pink buttons - J
- orange buttons - Hubby & I
- Dog - Dukie
- blue buttons - S
- yellow buttons - M
- multicoloured buttons - Maureen
- silver buttons - mum.

- plain heart - our love for Maureen
- decorated heart with cross on it - Christ love for you & me! 

Share/Bookmark

Monday, September 27, 2010

A day for wings...


Created: 15-Jul-2008 


I've actually ported this over from my other blog in Wordpress that I'm thinking of shutting down... or just leaving dormant for now (like I did this one... LOL!)

Motivated by the fact that school resumes the coming week, I've had a full and VERY satisfying day of wing creations!! :-) Yup... wing creations!! Two of these wing creations (ladybug & grasshopper) had already been made prior as birthday dress-ups for when DS1 was 3 yrs old & DD was 1 yr old. When DS1's kinder teacher saw them, she absolutely loved them. So I've just resized the wings to fit the bigger vests. Easy as pie!

The dragonfly however, was newly created in this last week & I had to rethink of how to make them. I'm totally happy with the result! They did come out better than I had expected. *hehe*  :-D

As for the butterfly wings at the end, they were created just for my daughter... who seems to be going through an "I love butterfly" stage (as I guess most little girls of about 3 yrs would at this age). I'm guessing that this love of butterflies have also been further inspired by Dorothy from the Wiggles... when she sings "Butterflies flit from flower to flower... dancing their happy way..." as my DD absolutely LOVES that song! The wing pattern themselves, were inspired by those T-shirts that they sell at "Cotton-On for Kids"...  :-). I thought it was a great idea & so decided to create them for my daughter too! Finally I have got the ideal thing to create to get rid of all those lengths of netting I'd bought previously for some other idea I had that never eventuated to anything! Oh well!
Here are pictures of those creations!


Oh... & for all those babywearing fans... I actually threaded the shoulder straps of my 1/2 buckle tai through the arm holes of the vests & tied them on... & made for a really cute baby carrier with ladybug wings on!!  *hehe* Just for the fun of it all! What... it was for baby... (I'll see if I can take a picture or two of it & post it up later on!)
OK... here's the picture of my baby carrier with ladybug wings...  :-) Sorry, forgot to lift the hood...


(a) Dragonfly wings
Made with:
Navy polar fleece vests (from Target), Navy blue netting, quilting wadding, thin cotton black cloth, blue remnant fabric (bought with those shiny blue dots already fixed onto the fabric)


(b) Grasshopper wings
Made with:
Green polar fleece vests (from Target), thin cotton green cloth & olive green craft fur fabric


(c) Ladybug wings
Made with:
Black polar fleece vests (from Target), thin cotton black cloth & red with black polka dots craft fur fabric


(d) Butterfly or Angelic wings
Made with:
Navy blue netting


Let me know what you think!


Thanks.

Share/Bookmark

Sunday, September 26, 2010

Melt-in-your-mouth biscuits

Biscuits: 23-Dec-09

Recipe from Sarah at Baby-Carriers-Downunder.com Community These cookies were soooo delicious I ended up emmm... making them & filling them in jars for friends for Christmas presents in 2009...

Ingredients:
1 cup butter or margarine or nuttelex (approx 250g)
1/2 cup icing sugar (sieved)
vanilla essence to taste (approx 4 drops)
1 3/4 cup plain flour
cocoa powder to taste (optional for chocolate version)

Method:
1. Cream butter & sugar till light & fluffy.
2. Add vanilla essence & mix with cake mixer.
3. Add flour & mix with cake mixer.
4. Fill cookie gun & pipe mixture onto lined baking tray.
5. Bake at 180oC for 15 - 20 mins till golden.
6. Note: each oven is different, my table top convection oven, I baked at 160oC for about 8 mins but my normal oven, I baked at 170oC for about 10 mins.

(a) Christmas tree - I added a few drops of green colouring, then sprinkled 100s&1000s for deco before baking.
(b) flowers- I added pink colouring, then put 1 cachous in the middle of each flower before baking.
(c) chocolate cookies, after baking & cooled, I melted & drizzled white chocolate over the top of them for deco & tastes extra nice this way too! :-)
Share/Bookmark

Onigiri (another form of Sushi)

Lunch: 25-Sep-2010


I had always called this sushi as well... even though it wasn't like the traditional sushi rolls but has since been corrected by one of my friends, Alpha (Thanks!)...  :-D My kids LOVE having this... although I do make them in the huge jumbo size now... LOL! Simply because when I made tiny little ones, they were eating it faster than I could actually make them... *hahahaha*  ;-P


2 cups of rice made about 18 little onigiris as pictured above.
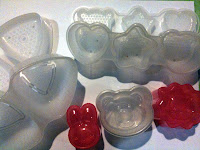
2nd picture on the right shows the onigiri moulds (the ones I have)... :-)


Ingredients:
Sushi Rice
Japanese Rice Vinegar (optional - I don't put this for my kids)
Japanese Sushi Rice flavouring (sprinklings)
Canned Tuna
Canned Corn
Japanese Mayonaise


Most ingredients obtainable from your local grocery stores like Coles & Woolworths. You may need to go to your local asian grocery store for the rest (eg. Japanese Sushi Rice Flavouring/sprinkling)! :-)


Method:
1. Cook 2 cups of sushi rice in your rice pot.
2. Add 6 dinner spoons of sushi vinegar once rice cooked & mixed thoroughly. (Oh & according to Wiki, not supposed to put vinegar in onigiri that's only for sushi... Ooopsss... you are meant to just lightly salt the rice instead.)
3. Using your onigiri moulds, add sushi rice flavouring, then cooled sushi rice 1/2 way up the onigiri moulds (wetting your hands and pushing the rice in to compact it).
4. Add a filling of your choice (pictured above, there is tuna mixed with corn and Japanese mayo, but you can put anything from ham to bacon, whatever suits your fancy).
5. Top up with sushi rice. So it is like a tuna rice sandwich.
6. Cover mould with mould cover & press to compress the rice.
7. Remove cover, then invert & push onigiri out.


Other options: use different flavoured rice sprinklings, or buy japanese beancurd and stuff rice inside... Enjoy!


Below picture... was when I went nuts & produced I think 2 trays of this (maybe it was just 1)... for my god-daughter's 1st month party... :-D


Share/Bookmark

Basic Cookie Dough 1

Biscuits: 17-Dec-09


Basic Cookie Dough recipe is from the "100pc Cookie Cutter Set" box packaging! LOL!


I found this cookie dough to have a funny bite - but that was perhaps because my cookies were a bit thick but subsequent cookies were a lot thinner (as pictured here) & tasted much nicer.


I made these cookies with 2 batches of cookie dough & that yielded about 30- 40 cookies I think... :-)

Ingredients:
120gm Unsalted butter
1/2 cup Castor Sugar
1 Whole Egg
2 cups SR Flour, sifted
3 - 4 drops vanilla essence

Method:
1. Preheat oven to 170oC & lightly grease 2 trays.
2. Using an electric mixer, beat butter & sugar till light & fluffy.
3. Add egg, mix till combined.
4. Add sifted flour & vanilla essence.
5. Knead mixture to form a ball.
6. Wrap dough in plastic film & place dough in fridge to rest (approx 20 mins).
7. Using rolling pin, roll dough evenly on a clean, lightly floured surface until it is 3 - 4 mm thick. (I actually took a portion at a time out & flattened with my hands - found that easier to do as it was sticking to my rolling pin & I couldn't be bothered to keep putting flour on it...)
8. Use cutter to shape dough into desired shapes.
9. Place on prepared oven trays & cook for about 5 mins or until lightly golden (Mine took about 20 mins).
10. Remove from oven & transfer to wire rack to cool.
Decorate with icing sugar (I decorated mine with white chocolate).


Alternative:
Vary this cookie dough by simply adding your favourites to the flour. (eg. sultanas, cherries, lemon rind, orange rind, chocolate bits).

Share/Bookmark

Saturday, September 25, 2010

Pandan Chiffon Cake

Cell Group dessert: 24-Sep-2010


Thanks HEAPS Wai Wai for this BEAUTIFUL & super easy recipe!!! YUMMMMMM... You are famous here in DownUnder... :-D And thanks Steph for the yummy picture of the almost finished cake! LOL! Glad you enjoyed it for tea too when I came a visiting during your confinement... *hehe* Oh & apologies for the weight being in ounces instead of grams... I think though, most weighing scales should have both types of weigh styles on them (at least mine do). The recipe was given to me in ounces...  :-)

Ingredients:

In 2 separate bowls:


Bowl A:
6 x egg yolks
2oz (liquid oz) vegetable oil (I used sunflower/rice oil)
2.5oz raw caster sugar
5oz self-raising flour
2oz (liquid oz) low fat coconut milk (Ayam brand)
1/2 tsp pandan paste 

Note: Pandan paste, I used "Bake King Best Quality" Pandan Paste bought from Gim Hin Lee (address is in Spore) - my mum bought then didn't use... so emmm... yah... I've got it now! *hehehe* lots more pandan cakes coming up!! yummy!

Bowl B (cake beater bowl):

- Important note: make sure this bowl has absolutely NO GREASE on it... wash it in super hot soapy water if necessary!!

6 x egg whites
2.5oz raw caster sugar
1/2 tsp salt
1/4 tsp cream of tartar

Method:


Note: To grease or NOT to grease... that remains the question for chiffon cakes... I bake without greasing - but then have slight difficulty removing cake from tin. However, a friend has mentioned that when she did grease the tin, the cake just dropped out of the tin when she inverted it to cool and when she didn't cool it upside down but removed it instantly from the cake tin, the cake flopped & lost its airyness. 

I've just tried partially oiling the tin (ie. I oiled the funnel in the centre & a little bit of the base of the funnel to make it easier to get out... )... Some think that the tin should not be greased at all just so that the cake can work its way up the surface & also something for the cake to stick too when placed upside down to cool...

1. Using a bit of olive oil spray, grease Chiffon cake tin - just the funnel & base of funnel (alternatively: use normal cake tin but line with baking paper - paper must rise higher than cake tin, as this cake will rise high).
2. Mix all ingredients in Bowl A (egg yolk mixture) using a spoon or fork. Make sure it has been mixed well! Then set aside.


3. Using a cake beater, whisk ingredients in Bowl B (egg white mixture) until white, stiff & glossy. Do a test: put bowl of beaten egg white upside down, if correct consistency, nothing moves, egg white remains in bowl. If as you're putting bowl upside down, egg white moves, it has not been beaten enough.


4. Take 1 spoonful of egg white & mix into the egg yolk mixture to thin the egg yolk mixture slightly.


5. SLOWLY fold egg yolk mixture INTO egg white mixture.
6. Pour mixture into Chiffon Cake Tin & smooth top of cake.
7. Bake at 150Celsius for 1 hr or till skewer comes out clean.


8. Cool cake in tin upside down until completely cool before removing from tin. 

Alternatives:

Instead of 2 liquid oz = 1/2 tsp pandan paste & coconut milk, try:
(a) 2oz = Lemon Rind, a few squeezes of lemon juice & make up the rest of the weight with milk (separately otherwise milk may curdle) - then pour separately into egg yolk mixture.
(b) 2 liquid oz Orange juice (1 Large orange was sufficient for me) plus rind of 1 orange - my MIL's favourite - Orange Chiffon Cake - she was over the moon when I did this for her birthday... :-) Will post in a different posting eventually I'm sure! :-D
(c) Add 25g black sesame seed powder to a liquid measuring cup, then pour & mix in low fat soy milk up to the 2 liquid oz level.
(d) Add 40g (1/3 cup + 1 tbsp) unsweetened cocoa to a liquid measureing cup, then pour & mix approx 80ml (1/3 cup) hot water up to the 2 liquid oz level.


Yum yum... enjoy!! :-D
Share/Bookmark

Thursday, September 23, 2010

Attempts at cake decorating (more to come later on...)


E's 6th b'day cake decorated with mini M&M's with basketball candles... :-D shared at Sunday School... I think that was his last year at the younger class... *sigh* my little boy is growing up...


J's 4th Birthday cupcakes... shared at sunday school... :-) 


My first attempt at cake decorating...  a big cake that is...

Dessert - 06-Dec-2009

I decorated my mum's yummy chocolate cake & am now totally hooked as you'll see in the next few posts...

In this decorating though, I used pre-made Betty Crocker icing & another brand, I can't remember the name but will update when I see it again... plus butterfly sprinkles & pre-made sugared flowers.

The chocolate words, I bought from Muddings, Glen Waverley... :-) The little umbrella, I threw in just to add some colour & depth... *hehe*


THE GRAND FINALE... 

All these cake decorating led to the grand finale...  my nephew's cricket cake... Yummy!! He totally LOVES cricket & can actually hold a decent intelligible conversation about cricket with an adult... (mind you intelligible to someone who knows the game... he tried explaining it to me.... & had to explain just about every terminology he used! *hahahaha*)

Preston's 9th Birthday Cake
Afternoon Tea: 12th Dec 2009

Chocolate cake made by my mum Sally... & decorated by me... 

Cheerful butter icing (from allrecipes.com.au)


Ingredients:
165 grams butter, softened
4 cups icing sugar
40 ml milk
1 teaspoon vanilla essence
4 drops of food colouring


Method:
1. Place butter in microwave for a few seconds if it is not very soft.
2. In a medium bowl cream the butter, icing sugar and milk until it is light and fluffy. This may take up to 5 minutes.
3. Add the vanilla and food colouring, and beat until well combined.
4. Fill piping bag or icing gun with icing, and decorate your creations.
5. Any leftover icing will keep in a tightly closed container for a few days, simply melt it in the microwave before use, or let it reach room temperature on the kitchen bench.
6. I put sprinkles on top of the icing to make it more bright & colourful!
7. Words - use melted dark chocolate.


The bats-man (I initially put him facing the bowler straight on instead of side-ways as he looked like he wanted to pee... my nephew & I had a jolly good laugh at that! *hehe*) 


bowler 


 ball catchers

Share/Bookmark