Pages

Saturday, April 9, 2011

Orange Poppy Seed Chiffon Cake

Date: 9-Apr-2011


A lot of this recipe has been taken from the Pandan Chiffon cake recipe as I used the same recipe to do this cake, so don't mind, but you will find similar wordings.

The Orange Poppy Seed Chiffon cake tasted yummy - It really is nice & soft with that touch of crunch from the poppy seeds... Mmmmm...... Great with a nice hot cuppa!

Ingredients


Zesters are the best things!
In 2 separate bowls:

Bowl A:


6 x egg yolks
2oz (liquid oz) corn or canola oil (I used olive oil)
2.5oz raw caster sugar
5oz self-raising flour
2oz (liquid oz) freshly squeezed orange juice
zest of 1 orange
1/4 cup poppy seeds
White, Stiff & Glossy!
Note: I used Navel Oranges for juice & zest.


Bowl B (cake beater bowl):

Important note: make sure this bowl has absolutely NO GREASE on it... wash it in super hot soapy water if necessary!!

6 x egg whites
2.5oz caster sugar
1/2 tsp salt
1/2 tsp cream of tartar

Method

1. I have bought some nice new heavy duty non-stick cake tins & do not need to oil/grease them.   (alternative: use normal cake tin but line with baking paper - paper must rise higher than cake tin, as this cake will rise high or use a deep non-stick cake tin but just line the base to make it easier to remove cake from tin).


Egg Yolk Mixture - well mixed!
2. Mix all ingredients in Bowl A (egg yolk mixture) using a spoon or fork. Make sure it has been mixed well! Then set aside.


3. Using a cake beater, whisk ingredients in Bowl B (egg white mixture) until white, stiff & glossy. Do a test: put bowl of beaten egg white upside down, if correct consistency, nothing moves, egg white remains in bowl. If as you're putting bowl upside down, egg white moves, it has not been beaten enough.

4. Take 2-3 spoonfuls of egg white & mix into the egg yolk mixture to thin the egg yolk mixture slightly.

5. SLOWLY fold egg yolk mixture INTO egg white mixture.
6. Pour mixture into Chiffon Cake Tin & smooth top of cake.
7. Bake at 150Celsius for 1 hr or till skewer comes out clean.


8. Cool cake in tin upside down until completely cool before removing from tin. 

Alternatives:

Instead of 2oz = orange juice, zest of an orange & poppy seeds, try:
(a) Pandan Chiffon Cake
Enjoy!
(b) 2oz = Lemon Rind, a few squeezes of lemon juice & make up the rest of the weight with milk (separately otherwise milk may curdle) - then pour separately into egg yolk mixture.
(c) Add 25g black sesame seed powder to a liquid measuring cup, then pour & mix in low fat soy milk up to the 2oz level.


Share/Bookmark

Birthday Golf Cake

Birthday Cake: 2-Apr-2011


Decorated this cake for a friend & I thought I'd show some pics of it...  Inspiration for the decoration came from this parenting website.

My mum baked the massive chocolate walnut liquor cake... :-) 

I used:
(a) rough dried shredded coconut (not the fine one & not the fresh one either) - for grass dyed green using green & a bit of yellow food colouring
(b) egg roll biscuits (from the Asian Grocery Shop) -  crushed up for sand
(c) red coloured Strapz - for the flag
(d) small skewer - for the flag pole
(e) 1 large chocolate melts - for the hole
(f) 3 Lindt golf balls (bought from SweetAs)
(g) Strawberry Frosting (which my mum said was the wrong frosting to use... Ooopsss) - dyed bluish for water - pictured doesn't look too blue & it wasn't, I think I had to put more blue into it next time, oh well! & green for the grass green where the flag pole is.


Share/Bookmark

Friday, April 1, 2011

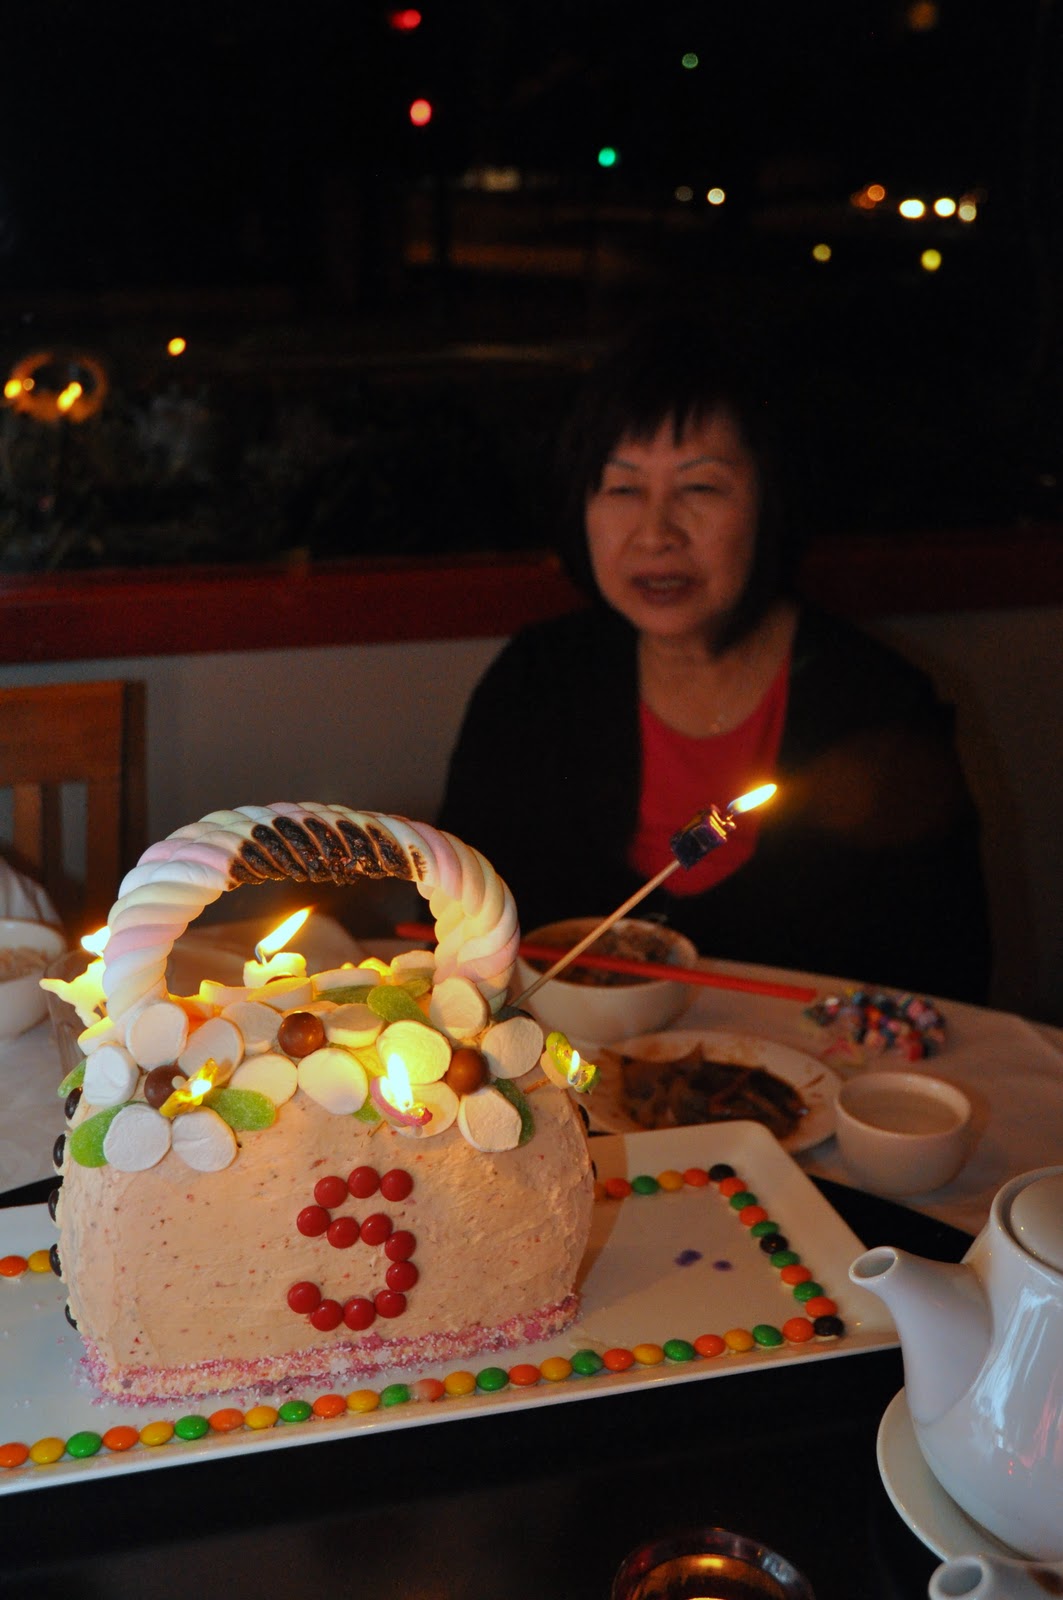
Birthday Purse Cake

Date: 31-Mar-2011

Blessed Birthday Mum!!  :-D We celebrated mum's birthday at Formosa House Chinese Restaurant (Add: 86 Springvale Rd, Nunawading). Food there was excellent especially that fish that was recommended to us... yum yum!! My hubby has helped me to label the types of food we ordered! LOL!

OK not sure what's happening with the arrangement of the photos here... but here they are anyway...

Canton Pork Ribs
Crispy Chicken


Sizzling Mongolian Lamb


Spicy Salt Deep Fried Fish
Yummy food!!


Combination Tofu Hot Pot
Baked the usual Japanese Strawberry Shortcake then covered it with the same frosting I used for the Birthday robot cake.

The idea was inspired by this website: http://www.parenting.com/article/how-to-make-a-purse-cake.

Ooopsss! Candles burnt the handles!
I used:
(a) for handles: long twisted marshmallows - cut into 2 long pieces (you can buy them at the sweet section of BigW in ForestHill, VIC. It took a ridiculously long time just to find the long marshmallows... one of those where you remember seeing them somewhere but can't quite remember which shop it was, so you end up visiting many shops to find it & finally find it in the very last shop...).
(b) for flower petals: normal white marshmallows - cut into 3
(c) for center of each flower: Malteesers
(d) for leaves: Spearmint leaves - cut into 2 (can be found in Target)
(e) for buttons on side of bag - brown M&Ms

Cake anyone?

I sprinkled pink 100s & 1000s at bottom just for added fun... & made a colorful border on the cake plate, using the left-over M&Ms.

Note: Do not put candles near the handles, as you can see, those marshmallow handles burn easily!

Share/Bookmark

Monday, March 21, 2011

Cotton Soft Japanese Cheesecake

Dessert: 15-Mar-2011


This cheesecake really lives up to its name... being very very soft & cotton-y....  :-)  Its texture is more like a light sponge cake, not the heavy baked or refridgerated cheesecakes...


Recipe obtained from Diana's desserts website.


Ingredients:
50g/2 oz. butter 
250g/9 oz. low fat Philadelphia cream cheese 
100 ml/3 fluid oz. low fat fresh milk or full fat (35%) cream (I preferred using lactose free low fat milk but for a more creamy texture, use full fat cream)


140g/5 oz. raw caster sugar
1/4 tsp. salt 
1/4 tsp. cream of tartar
6 egg whites 


6 egg yolks
1 tbsp. lemon juice 
60g/2 oz. cake flour /superfine flour 
20g/1 oz. cornflour (cornstarch) 

Note: I used Anchor Lighthouse cake, biscuit & pastry self-raising flour. This is a specialty flour that makes cakes much lighter as it contains less protein. 


Admittedly, I have not tried using normal self-raising flour, and so don't know if it makes a huge difference. I might do that one day when I'm desperately wanting to eat this cake and have run out of this flour but can't be bothered to go out to buy a box of it... LOL!


Instructions
1. Melt cream cheese, butter and milk over a double boiler. Cool the mixture.
2. Whilst mixture is cooling, in a separate bowl, mix well, egg yolks and lemon juice. Add cooled cream cheese mixture to egg yolk mixture.
3. Fold in the flour and the cornflour into the yolk mixture.
4. Whisk egg whites with cream of tartar until foamy. Add in the sugar and salt and continue beating until egg whites are stiff & glossy.
5. Put 2 - 3 spoons of egg white mixture into egg yolk mixture & mix well. Egg yolk mixture should lighten & not be as heavy.
6. Gently fold in 1/2 of egg yolk mixture into egg white mixture until well mixed. Gently fold in remaining 1/2 of egg yolk mixture into egg white mixture until well mixed.
1 slice is never enough! Yum!
7.Pour into an 8-inch round cake pan (Lightly grease and line the bottom and sides of the pan with greaseproof baking paper or parchment paper). 
8. Bake cheesecake in a water bath for 1 hour 10 minutes to 2 hours or until set and golden brown at 160 degrees C (325 degrees F). 


Note: I tried & it works, putting into a approx 23cm with paper lined base, non-stick round cake tin & baking at 170C in a water bath for about 1.5 hours... hence lessening the baking time - nice!


For a nice variation, add 1 tbsp black sesame seed powder.


Makes 1 (8-inch) cheesecake, 12 servings.

Share/Bookmark

Saturday, March 19, 2011

Birthday Robot Cake

Birthday Cake: 19-Mar-2011


Made this cake as a special request from a friend, Karen for her son, Seth... Enjoyed baking & creating it... Blessed 8th Birthday Seth!


Robot cake idea was copied from here: http://www.kulturblog.com/2009/07/robot-cake/

Karen's blurb:


Karen, the cake was a BIG hit! The kids went crazy over the lollies and icing (of course!), the adults really liked the strawberries and the vanilla sponge.  We all had seconds! :) I still hv the robot's head in my fridge and slowly savouring it! Absolutely delicious!  Sponge cake was just right, not too dry.  Even tho strawberries were a little sour, I thot it went well with the icing.  Personally, icing was a little too sweet for my liking tho.


A HUGE thank you for doing this.  Seth loved it!  We weren't allowed to eat its head! but a few days' time, he'll soon realise its gone! ha! You did very well with decorating the cake.  Its exactly what I wanted..colour, lollies deco and the mashmallows...all turned out well, even the last minute chopping board! :P  Overall a fantastic job well done.  


Cake & Filling Recipe
The cake was made using the recipe I blogged about just before, the japanese strawberry shortcake. I doubled the recipe & baked it in 2 tins, a 7" & an 8" square tin, lining just the bottom of the tin with baking paper & sprayed some oil onto it. When cake has cooled completely, cut cake horizontally twice, so that you end up with 3 layers of cake.


The filling was also the same recipe as in the japanese strawberry shortcake recipe complete with fresh cream & strawberries! :-)


Coloured Frosting Recipe:
The colored icing on the outside was made using Martha Stewart's Sprinkles Strawberry Frosting.


I made 2 lots of frosting using 500g unsalted butter & put 4 tbsp strawberry puree instead (as I did not want it too pink) & 6 cups of pure icing sugar. After frosting was prepared, I measured out about 1 cup of frosting & added about 1/4 tsp of color that I needed (except for the black, where I used 1/8 tsp - as I want grey not charcoal! LOL!). 


The blue required about 3 - 4 cups of frosting, whilst the green & grey only required 1 cup of frosting each.


Ingredients:
1/2 cup strawberries, cut small & blended into puree (you will need 4 - 6 tbsp of this strawberry puree)
500g unsalted butter
2 pinches of sea salt
6 cups pure icing sugar, sifted
1 tsp vanilla essence


Method:
1. Process strawberries using a barmix or blender until pureed.
2. In the bowl of an electric mixer, beat together butter & salt on medium to high speed until light & fluffy (butter changes to a lighter color & lighter consistency).
3. Reduce speed & slowly add icing sugar. Beat until well combined.
4. Add vanilla & strawberry puree (save any remaining strawberry puree for another use). Mix until just blended. 
5. Do not over mix or frosting will incorporate too much air. Frosting consistency should be dense & creamy, like ice-cream. (Although I like my frosting to be a little lighter so I actually beat it mine a little more).


Assembly of cake
I used the smaller cake (7") for the body & cut up the 8" cake for the head, saving the off cuts for the hands & feet. I then used Pascall's White Mega Mallows (I have to find out where to buy this from, as Karen had them in her pantry & passed them to me... and I've not seen pure white marshmallows in Safeway or Coles for the longest ever time...) for the arms & legs, neck, ears & eyes. Additional lollies for decoration.
Share/Bookmark

Wednesday, March 16, 2011

Japanese Strawberry Shortcake

Dessert: 6-Mar-2011


Made a really light & yummylicious cake to celebrate the birthday of the best brother in the whole wide world!!  :-D It was huge & fed about 24 people (incl kids)

Recipe was adapted from Aunty Yochana's recipe, found here: http://auntyyochana.blogspot.com/2007/03/japanese-strawberry-shortcake.html

Choc disc from Michel's Patisserie,
I added my brother's name & dots...


Ingredients:
Cake:
180 gm. cake flour
1/2 tsp. baking powder
75 gm. sugar
75 gm. melted butter 
75 gm. vegetable oil (I used sunflower oil)
6 egg yolks
1 tsp. vanilla essence
6 egg white
1/2 tsp cream of tartar
100 gm. castor sugar

Decoration:
600 ml thickened cream (full cream as less fat cream will not whip)
1/2 cup confection sugar
12 Tbsp. Kirsch
2 punnets strawberries - diced (for filling)
1 punnet strawberries - thinly slice (for deco)
2 Tbsp. Strawberry jam + 2 Tbsp. hot water + 1/2 tsp powdered gelatine - for glazing fruit


Note: each punnet is about 250g.

Method:
1. For cake: Sieve cake flour, baking powder and 75 gm. of sugar into a bowl and mix thoroughly.
2. Mix egg yolk, vanilla essence, butter and oil together
 and then pour into flour mixture and stir till smooth.

3. Whisk egg white till slightly frothy, then pour in 100 gm. sugar & cream of tartar gradually and whisk till stiff & glossy.
4. Fold egg white with egg yolk mixture slowly and then pour into a 24cm round springform cake tin.
  
Cake anyone?? Yummylicious!

5. Bake in preheated oven at 150C for about 60-80 mins. or till cooked.
6. Cool cake completely in cake tin upside down then remove & slice cake into 3 slices.
7. Brush each layer of cake with the 4 tbsp kirsch in each layer.

8. Whip up the whipping cream. Mix approximately 1/2 of cream with diced strawberries and then spread whipped cream & strawberry mixture onto each layer. Repeat till the last layer of sponge cake. 
9. Spread the cake on sides & top with remaining whipped cream. Arrange sliced strawberries on top overlapping one another.
(8) Boil strawberry gel with water then brush it over the sliced strawberries.
(9) Chill before slicing and serve.


Share/Bookmark

Monday, March 14, 2011

Choc Peanut Butter Cup Cheesecake

Finally I get to make this most divine yummyliciously rich cake... for my own birthday... I couldn't find anyone who was going to volunteer to make this particular cake for me... so I had to do so on my own... & it was most deliciously decadent...  :-)

Recipe from: http://www.notquitenigella.com/2011/01/19/chocolate-peanut-butter-cup-cheesecake/

BTW, Check out Not Quite Nigella's website its totally awesome full of yummy goodies!


Chocolate Peanut Butter Cup Cheesecake

An original recipe by Not Quite Nigella (mousse adapted from Willow Bird Baking)

Ingredients:
Crust
  • 2 packets x Arnotts Chocolate Ripple biscuits - crushed finely
  • 100 g melted butter (approximated)
  • 1 x large Cadbury's Flake milk chocolate flakes
Filling
  • 750g Philadelphia Light cream cheese 
  • 4 eggs
  • 1/2 cup raw caster sugar
  • 200g Kraft light smooth peanut butter
  • 2/3 cup milk chocolate chips
  • 1/2 tsp plus a pinch of sea salt
Mousse topping
  • 1 tsp gelatin
  • 1 cup Lactose-free thickened cream (or normal thickened or heavy cream)
  • 2 large egg yolks
  • 1 1/2 tbsp sugar
  • 50g cooking milk chocolate, chopped
  • 10 Lindor peanut butter balls (bought from Lindt Cafe in Chadstone)
  • 3 packets of Reese’s peanut butter cups (each contains 2 cups)

Method

Huge cake!
1. Preheat the oven to 160C and find a baking tray that will fit your 22cm - 25cm good quality springform tin in so that you can make a water bath for the cheesecake that goes halfway up the cake.

2. For the crust, mix the butter and biscuits and press up the sides of the springform tin. Sprinkle milk chocolate flakes on the bottom. Set aside in the refrigerator.

3. Put a kettleful of water on the boil.

4. For the filling, beat cream cheese, sugar and salt until smooth.
5. Add eggs one at a time and the peanut butter and beat until smooth but do not overbeat. Mix in the chocolate chips.
6. Take out the biscuit base. Put 2 layers of foil around the tin to prevent any water from the water bath from getting in. It’s useful to have that wider foil for this task if you have it. I didn’t and it was still ok though.
7. Place cake tin in a deep baking dish and pour the cream cheese filling into the foil lined tin. Submerge the Lindor balls into the cheesecake.
8. Pour the boiling water from the kettle around the cheesecake so that it sits in a bath being careful not to splash any on the cheesecake itself.
9. Carefully transfer to the oven and bake for 1 1/4 hours although you may want to check at 1 hour. The outside should be set and the inside with a hint of wobble which will firm up in the fridge. Remove the foil and cool on a wire rack and when cold, place in the fridge overnight covered with clingfilm.

10. For chocolate mousse, dissolve the gelatin in a little bit of warm water.
11. In a saucepan over moderate heat, cook the cream until it bubbles around the edges.
12. In another bowl, whisk together egg yolks and sugar. Temper the eggs by pouring about 1/2 cup hot cream into the egg yolks slowly while whisking vigorously.
13. Slowly pour the egg mixture into the saucepan of cream (whisking constantly) and add chocolate. Cook over low heat, stirring constantly, until thickened, about 3 minutes.
14. Remove from the heat and whisk in the gelatin. Place mixture into a wide bowl to allow it to cool for a bit, then chill it for just a little while — not until set, but until it’s not so runny. Pour the mixture onto the top of the cheesecake and refrigerate at least one hour or overnight.
15. Decorate with chopped Reese’s cups, if desired.


Enjoy! Although a piece is enough for each  round... You'll be back for more the next day... it was most yummy!

Share/Bookmark